Most of the vendors wants to offers surveys to get the feedback from customers to improve support experience and to provide better support. There are several ways where we can collect the feed back from customer ex: on case closure, you can send survey email to customer or some of them wants to offers survey after chat. In this post I am going to explain how to embed surveys into chat(with Live Agent(Chat Agent) / Snap-ins(Embedded Chat))
NOTE: Salesforce summer 20 have an option to add post-chat surveys to chat without customization but it requires an additional license.
License: To create a data map, users need the Salesforce Surveys Advanced Features permission, available with the Customer Life-cycle Designer license.
If anyone have the license they can proceed with point an click setup, if you don't have a license the better approach is to proceed with small customization below.
Summer 20 Survey Notes: Link
Live Agent ,Omni Channel and Snap-ins setup tutorials
1. https://reddymallareddy.blogspot.com/2018/08/setup-live-agent-in-salesforce.html
2. https://reddymallareddy.blogspot.com/2019/10/steps-to-setup-omni-channel-and-benefits.html
3. https://reddymallareddy.blogspot.com/2019/10/steps-to-setup-embedded-services.html
Below are prerequisites to test this :
=====================
Chat Agent with Community and Enable Surveys
OR
Chat Agent , Omni with Community and Enable Surveys
OR
Chat Agent, Omni and Snap-ins with Community and Enable Surveys
Refer above tutorials to setup Chat Agent , Omni and Snap-ins.
1. Create Survey record and store Survey Id for future use
2. Collect the survey name for future use
3. Get the community ID for future use -> This can be captured either with soql query or from setup by following below path.
setup->Build ->Communities-> Click on Builder
4. Get the community URL
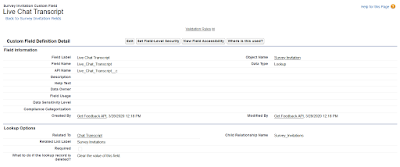
5. Add fields and create relationship between Chat Transcript object and Survey Invitation
6. Create custom lookup on Survey invitation object and select related to as Chat Transcript
7. Create Text field on Chat Transcript to store Survey Invitation URL
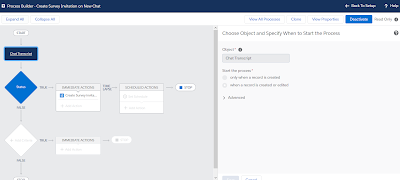
8. Automate Survey Invitation creation on chat (You may do it with Triggers OR Process builder, Here I am using Process builder)
9. Create a process Builder on Chat is Created or Updated
10. Use filter as when chat status is changed to In progress and also make sure select the checkbox in Advanced to avoid recurrrence.
Do you want to execute the actions only when specified changes are made to the record? - > YES
11. In this step we are going to create Survey invitation. Provide Id's where ever is needed and follow the below screenshot
12. With this steps we are done with Survey Invitation creation and in next step we need to update Chat Transcript with Survey URL.
13 this can be don in two ways - either you can use field reference from Invitation link field from Survey Invitation else use formula field. The values we collected at the beginning will help here.
14. Create process builder in Survey Invitation object
15. Add filters to check if Transcript exist or not.
16. Perform update operation on Chat transcript and update custom field that we created in step-7. Here in screen shot I am using field reference , however if you want you can use formula also. Here is the sample format of formula.
'https://*********-developer-edition.ap5.force.com/CommunityName/survey/runtimeApp.app?invitationId='+
[SurveyInvitation].Id+
'&surveyName=case_survey_report&UUID='
+[SurveyInvitation].UUID
17. As a next step we need to create Visual-force page and controller. Below is my sample controller and page
Visualfoce:
======
<apex:page controller="Surveyctlr" action="{!LaunchSurvey}" >
</apex:page>
Apex Class:
=======
public class Surveyctlr{
public PageReference LaunchSurvey() {
String link = [SELECT Id, Survey_Invitation_URL__c, ChatKey FROM LiveChatTranscript WHERE ChatKey = : ApexPages.currentPage().getParameters().get('chatKey')].Survey_Invitation_URL__c;
PageReference survey = new PageReference(link);
return survey;
}
}
18. Add your visualforce page and apex class to you community guest profile.
19. Make sure to create a community page with random name . Here I have create page as 'surveypage'
20. Make sure to update you chat button post chat url in the below format.
community url(which you have collected in step 4)/your community name/surveypage
In my case it will looks like below.
https://mallareddymadhu-developer-edition.ap5.force.com/Favicon/s/
22. As soon as you ends the chat from live agent , it will directly lands you on survey page . If you are using snapins you may see the below screen after you ends the chat.
22. As soon as you click on 'give Feedback' button , it will navigate to survey page like pic below. If you don't to skip survey, just click 'close Chat' button.
Thanks for blogging!!!
1. https://reddymallareddy.blogspot.com/2018/08/setup-live-agent-in-salesforce.html
2. https://reddymallareddy.blogspot.com/2019/10/steps-to-setup-omni-channel-and-benefits.html
3. https://reddymallareddy.blogspot.com/2019/10/steps-to-setup-embedded-services.html
Below are prerequisites to test this :
=====================
Chat Agent with Community and Enable Surveys
OR
Chat Agent , Omni with Community and Enable Surveys
OR
Chat Agent, Omni and Snap-ins with Community and Enable Surveys
Refer above tutorials to setup Chat Agent , Omni and Snap-ins.
1. Create Survey record and store Survey Id for future use
2. Collect the survey name for future use
3. Get the community ID for future use -> This can be captured either with soql query or from setup by following below path.
setup->Build ->Communities-> Click on Builder
4. Get the community URL
5. Add fields and create relationship between Chat Transcript object and Survey Invitation
6. Create custom lookup on Survey invitation object and select related to as Chat Transcript
7. Create Text field on Chat Transcript to store Survey Invitation URL
8. Automate Survey Invitation creation on chat (You may do it with Triggers OR Process builder, Here I am using Process builder)
9. Create a process Builder on Chat is Created or Updated
10. Use filter as when chat status is changed to In progress and also make sure select the checkbox in Advanced to avoid recurrrence.
Do you want to execute the actions only when specified changes are made to the record? - > YES
11. In this step we are going to create Survey invitation. Provide Id's where ever is needed and follow the below screenshot
12. With this steps we are done with Survey Invitation creation and in next step we need to update Chat Transcript with Survey URL.
13 this can be don in two ways - either you can use field reference from Invitation link field from Survey Invitation else use formula field. The values we collected at the beginning will help here.
14. Create process builder in Survey Invitation object
15. Add filters to check if Transcript exist or not.
16. Perform update operation on Chat transcript and update custom field that we created in step-7. Here in screen shot I am using field reference , however if you want you can use formula also. Here is the sample format of formula.
'https://*********-developer-edition.ap5.force.com/CommunityName/survey/runtimeApp.app?invitationId='+
[SurveyInvitation].Id+
'&surveyName=case_survey_report&UUID='
+[SurveyInvitation].UUID
Visualfoce:
======
<apex:page controller="Surveyctlr" action="{!LaunchSurvey}" >
</apex:page>
Apex Class:
=======
public class Surveyctlr{
public PageReference LaunchSurvey() {
String link = [SELECT Id, Survey_Invitation_URL__c, ChatKey FROM LiveChatTranscript WHERE ChatKey = : ApexPages.currentPage().getParameters().get('chatKey')].Survey_Invitation_URL__c;
PageReference survey = new PageReference(link);
return survey;
}
}
18. Add your visualforce page and apex class to you community guest profile.
19. Make sure to create a community page with random name . Here I have create page as 'surveypage'
20. Make sure to update you chat button post chat url in the below format.
community url(which you have collected in step 4)/your community name/surveypage
In my case it will looks like below.
https://mallareddymadhu-developer-edition.ap5.force.com/Favicon/s/
22. As soon as you ends the chat from live agent , it will directly lands you on survey page . If you are using snapins you may see the below screen after you ends the chat.
22. As soon as you click on 'give Feedback' button , it will navigate to survey page like pic below. If you don't to skip survey, just click 'close Chat' button.
23. Once you're done with feedback, a survey response record will be created in salesforce and looks like below. This can be accessed from Survey invitation record.
Thanks for blogging!!!


7 Comments
Will this custom process count towards the 300 free responses?
ReplyDeleteYes it is.
DeleteWill this custom process count towards the 300 free survey responses?
ReplyDeleteyes
DeleteHi! Thank you for this useful tutorial, but sadly it didn't work as expected.
ReplyDeleteI was capable of writing the invitation id into the transcript record (via a trigger on the transcript, I couldn't make it with PB), but the survey doesn't appear.
I believe I'm missing something in the step #19 or the Apex class (Surveyctlr) is not doing the job.
Can you please give me a hand here?
Thank you, again!
Best
Can you provided embedded post chat feedback code because above tutorial is not working for me ?
ReplyDeleteYou can find the code in the above post.
DeleteVisualfoce:
======
Apex Class:
=======
public class Surveyctlr{
public PageReference LaunchSurvey() {
String link = [SELECT Id, Survey_Invitation_URL__c, ChatKey FROM LiveChatTranscript WHERE ChatKey = : ApexPages.currentPage().getParameters().get('chatKey')].Survey_Invitation_URL__c;
PageReference survey = new PageReference(link);
return survey;
}
}