What Is Live Agent?
Live agent is one of the powerful tool where Customers can
directly communicate with support agents via live chat. Using live agent, support
representatives can directly chat with customers and resolve their issue. Live Agent configurations define the Live Agent
functionality that’s available to your agents and support supervisors when
agents chat with customers. Customer can chat with agents, this way you
can avoid wasting time over the call for hours and waiting for
response email. Chats can be quickly
routed to the right subject matter experts. And agents can provide answers
faster with a sneak peek to customer chat and keyboard shortcuts to pre-written
messages.
Pre-requisites:
- Enable Live agent
- Need to create console app else use existing Sample console app
- Agent profile should be API enabled
- Check the ‘Live agent User’ check box from the user page for the users who wants to use live agent
- As the administrator, navigate to the Salesforce Setup page (make sure you switch to Classic view, the Live Agent settings do not come up under the Lightning Experienceview).
- Find the Live Agent section under Build > Customize > Live Agent.
- API Endpoint: Go to the Live Agent Settings page and look for the Live Agent API Endpoint text box.
Creating Skills:
After you enable Live Agent in your
organization, you'll need to set up a basic implementation that you can later
customize to fit your users' needs. Creating skill is one of the part in basic
configuration. Skills identify
your agents’ areas of expertise. When you assign an agent to a skill, that
agent receives chat requests that are related to the agent’s skill areas. You
can also empower your supervisors to assign skills to agents. This information
applies to Live Agent routing for chats only. If our
day to day life, when we try to chat with someone, it will ask you to select
respective option with whom you want to chat with like “Billing Issue”, “Delivery
Issues”, “Technical Issues” etc. Options makes it very clear that chat will be
routed to respective team on based on your selection. This way you provide
better support to customers and resolve their issues in quick manner.
To create skill, navigate to “Build |
Live Agent | Skills | New”.
The above Image shows how to assign skills to the users OR profiles.
Creating
Button: We have two types of buttons are
available.
- Chat Button
- Automated Invitation
- Create
skills. Each chat button is associated with a particular skill or set of
skills so that chats that are initiated from the button are routed to the
appropriate agents.
- Create
a Salesforce site and static resources to use custom images for the online
and offline versions of your button. If you don’t have a Salesforce site,
you can specify online and offline button images or text by modifying the
code that’s generated when you create a button.(Optional)
Build | Live Agent | Chat Buttons &
Invitations| New
You can also setup auto greeting text in this
configuration whenever end user opens chat window.
We have different types of Routing are
available:
Choice : Incoming chat requests are added to the queue in Live Agent in the Salesforce console and are available to any agent with the required skill.
Least Active: Incoming chats are routed to the agent with the required skill who has the fewest active chats.This option is a push option, which means that incoming chats are routed, or “pushed,” to agents. You can specify the amount of time that an agent has to answer a chat request before it’s routed to the next available, qualified agent.
Most Available: Incoming chats are routed to the agent with the required skill and the greatest difference between chat capacity and active chat sessions. For example: Agent A has a capacity of eight and Agent B has a capacity of two. If Agent A has two active chat sessions while Agent B has one, incoming chats are routed to Agent A.This option is a push option, which means that incoming chats are routed, or “pushed,” to agents. You can specify the amount of time that an agent has to answer a chat request before it’s routed to the next available, qualified agent.
Omni: Incoming chats are routed to agents using Omni-Channel queues. You must route chats with Omni-Channel if you want to use Live Agent in Lightning Experience.
Customer
time-out: The amount of time from the last agent message before the chat
times out.
Push
time-out: Amount of time an agent has to answer a chat request before the
request is rerouted to another available agent.
Enable Queue: Check this
box to queue the chat until the agent with required skill is available.
Queue size
per agent: The queue's capacity to hold chat requests per available agent.
If chats have a size of 1, this is the number of chats allowed to queue for
each agent.
Overall Queue
Size: The
queue's capacity to hold chat requests. If chats have a size of 1, this is the
maximum number of chats allowed to queue.
Reroute
declined Requests: If all agents decline a chat request, the chat request is rerouted
and sent to available agents again. Available only for requests with Least
Active and Most Available routing types.
No of
Rerouting Attempts: Number of times a chat can be rerouted if all agents decline the
chat request. If nothing is specified, the chat will reroute infinitely or
until the customer exits the chat.
Automatically
Accept The Chat: The chats which are routing from this button will be
automatically accepted by the first available agent.
Live Agent Configurations
Configure what are all the
features are available while chatting with the customers. We have lots of options available to control behaviour
of Chat.
Navigate to “Build | Live Agent | Live Agent
Configurations| New”.
Sneak peak Enabled: This option lets agents see what visitors are
typing before they send the message
Request Sound Enabled: Enable to play a sound when an agent gets a
new chat request.
Notification Enabled: Enable desktop notifications for incoming
chats. Supported only on certain browsers.
Auto Away on Decline: Automatically change agent’s status to Away
when they decline a chat request.
Auto away on Push time-out: Automatically change agent status to Away when a
chat request that's been pushed to them times out.
Agent File Transfer Enabled: Allow agents to initiate file transfer during the
chat.
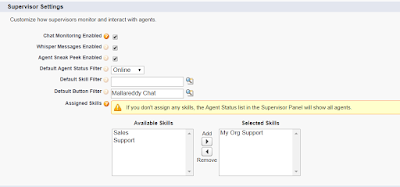
Chat Monitoring Enabled: Allows supervisors view agent’s ongoing chat transcripts
Whisper Message Enabled: Allows supervisors to send private whisper
messages to agents while agents chat with customers
Agent Sneak Peak Enabled: Allows supervisors to see what agents are
typing before they send messages to customers
Chat Conference and Transfer Settings
Sometimes, a single agent doesn't
have all the information that's required to solve a customer's problem. Chat
conferencing lets your agents invite other agents into a customer chat. Unlike
transferring the chat to a new agent, conferencing an agent into a chat doesn't
disrupt the flow of conversation with the customer.
Chat Conferencing Enabled: Let’s agent allow other agent to join in ongoing
chat.
Chat Transfer to Other Agent Enabled: Allow agent to transfer chat to other available
agent directly.
Chat Transfer to Skills Enabled: Allow agent to transfer chat to other agents
through skills.
Chat Transfer
to skill: Select the skill that agent can use to transfer the chat.
Chat Transfer to live chat Buttons Enabled: Allow agent to transfer chat to other agents through
chat buttons.
Live Agent Deployments
This is the final step we need to configure as a
part of live agent set up.
Navigate to - Build | Live Agent
|Deployments| New
Chat Window
Title: This title that appears in the chat window.
Allow Visitor
to save transcript: This will allow visitor to download chat.
Copy JavaScript and paste in Visualforce Page
Last step is to
copy JavaScript and paste in Visualforce which will be exposed as a Community
either in Customer or Partner Community. We need to copy JavaScript from two places:
Chat
Buttons and Automated Invitations
Navigate to “Build
| Live Agent |Chat Buttons & Invitations”. Select Button configuration
created
Deployments
Navigate to “Build
| Live Agent |Deployments| New”
Visualforce Page:
<apex:page
>
<apex:outputPanel
>
<apex:outputLabel
dir="top">please click on green button for connecting to
chat</apex:outputLabel>
</apex:outputPanel>
<html>
<body>
<img
id="liveagent_button_online_573B00000004F71" style="display:
none; border: 0px none; cursor: pointer"
onclick="liveagent.startChat('573B00000004F71')"
src="https://mallareddykmp-developer-edition.gus.force.com/resource/1478255477000/Mallareddy15__OnlineChatImage"
/><img id="liveagent_button_offline_573B00000004F71"
style="display: none; border: 0px none; "
src="https://mallareddykmp-developer-edition.gus.force.com/resource/1448393328000/Mallareddy15__OfflineChatImage"
/>
<script
type="text/javascript">
if
(!window._laq) { window._laq = []; }
window._laq.push(function(){liveagent.showWhenOnline('573B00000004F71',
document.getElementById('liveagent_button_online_573B00000004F71'));
liveagent.showWhenOffline('573B00000004F71',
document.getElementById('liveagent_button_offline_573B00000004F71'));
});</script>
<script
type='text/javascript'
src='https://c.gla3-phx.gus.salesforce.com/content/g/js/42.0/deployment.js'></script>
<script
type='text/javascript'>
liveagent.init('https://d.gla3-phx.gus.salesforce.com/chat',
'572B00000004F3t', '00DB00000001GQi');
</script>
</body>
</html>
</apex:page>
- After
creating console app , goto à
at the bottom you can see Live Agent click on it and make yourself online
- Goto the visualforce page the one
which you have created from there you can see the Green button where you can
initiate the chat. Click on it and wait and request will sent to agent
- Then goto console accept the chat.
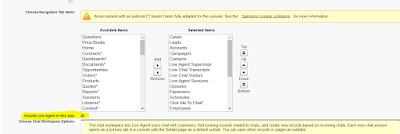
You can create new console app to enable Live agent else use the
existing Sample console app. Here I have created a new Console app.
Navigate to – Build | Create | Apps
Check the check box call “Include Live agent in
this app”
Also you can select what are all the tabs you want to show case on
this app.
- Also select the profiles who can have access to this app.
Enable User to Use Live Agent:
If anybody wants to use live agent they should be live agent user
else they can’t access the live agent widget in console and can’t able to make
them self as online/offline.
That’s all for now.


1 Comments
Thanks for the article! Live chat outsourcing has become a popular tool that helps to improve the business. Live chat agents are an important aspect for any company that aims to offer quality customer service. They save costs and make communication convenient for customers. Check more info I want to share with you: https://bit.ly/3gg0sWk
ReplyDelete